一、Algorithm
输出重叠元素索引
俩列表a b,如果a中的元素在b中,那么就保存此元素在a中的索引值,最后统一输出所有索引值。要求:时间复杂度小于O(n)
a = [5,3,1,5,4]
b = [5,3]
d = {}
for i in b:
    d[i] = 0
res = []
l = len(a)
for i in range(l):
    if a[i] in d:
        res.append(i)
print(res)
树的遍历???
输入几组数据,pid为-1的代表根节点。如果数据为非根节点,那么就要搜索此节点直至找到根节点。
| id | pid |
| A | -1 |
| A-1 | A |
| A-2 | A |
| A-3 | A |
| A-2-1 | A-2 |
| A-2-2 | A-2 |
| A-2-3 | A-2 |
result: /A /A/A-1 /A/A-2 /A/A-3 /A/A-2/A-2-1 /A/A-2/A-2-2 /A/A-2/A-2-3
d = {
    "A":"-1",
    "A-1":"A",
    "A-2":"A",
    "A-3":"A",
    "A-2-1":"A-2",
    "A-2-2":"A-2",
    "A-2-3":"A-2"
}
res = []
def func(node):
    array.append(node[0])
    if node[1] == "-1":
        return
    func((node[1],d[node[1]]))

for i in d.items():
    array = []
    func(i)
    string = "/".join(array[::-1])
    res.append("/"+string)

for j in res:
    print(j)
最短路径和 ???
从上到下找到最短路径(数字之和最小),只能往下层走,同时只能走向相邻的节点,例如图中第一排的2只能走向第二排的3、7,第一排的5可以走向第二排的1、7、3
| 1 | 8 | 5 | 2 |
| 4 | 1 | 7 | 3 |
| 3 | 6 | 2 | 9 |
array = [[1,8,5,2],
         [4,1,7,3],
         [3,6,2,9]]
x = len(array)
y = len(array[0])
dp = [[0 for i in range(y)] for j in range(x)]
# 遍历顺序是每行内的每列。所以遍历array中第一行只执行到if,dp中第一行就确定了,然后再确定dp第二行。
# 要注意两个边界条件
for i in range(x):
    for j in range(y):
        if i == 0:
            dp[i][j] = array[i][j]
        elif j == 0:
            dp[i][j] = array[i][j] + min(dp[i-1][j], dp[i-1][j+1])
        elif j == y-1:
            dp[i][j] = array[i][j] + min(dp[i-1][j-1],dp[i-1][j])
        else:
            dp[i][j] = array[i][j] + min(dp[i-1][j-1],dp[i-1][j],dp[i-1][j+1])

# [[1, 8, 5, 2],
#  [5, 2, 9, 5],
#  [5, 8, 4, 14]]
print(min(dp[-1]))
# 4
Last Substring in Lexicographical Order
1163.Last Substring in Lexicographical Order
Given a string s, return the last substring of s in lexicographical order.


Example 1:

Input: "abab"
Output: "bab"
Explanation: The substrings are ["a", "ab", "aba", "abab", "b", "ba", "bab"]. The lexicographically maximum substring is "bab".
Example 2:

Input: "leetcode"
Output: "tcode"


Note:

1 <= s.length <= 4 * 10^5
s contains only lowercase English letters.
class Solution:
    # 暴力大法好
    def lastSubstring(self, s: str) -> str:
        max_char_index = 0
        for n in range(len(s)):
            if s[n] > s[max_char_index]:
                max_char_index = n
            elif s[n] == s[max_char_index]:
                max_char_index = n if s[n:] > s[max_char_index:] else max_char_index
            else:
                continue
        return s[max_char_index:]


if __name__ == '__main__':
    strs = "cacacb"
    s = Solution()
    print(s.lastSubstring(strs))
二、Review
三、Tip
面试题 ???
-
什么是事务,事务的出现是为了解决什么问题
-
什么是聚簇索引
-
假如没有主键,InnoDB会以哪个字段建立主键
-
聊聊RabbitMQ中的connection与channel的关系,还有建立channel的一些规范或注意事项。
python线程
-
join
-
join(timeout)
-
deamon
0、两种创建线程的方式
实例化threading.Thread 或 继承threading.Thread并实现run方法
import time, threading

# 普通创建线程:
def loop(n):
    print(f"thread {threading.current_thread().name} is running...")
    for i in range(n):
        print(f"thread {threading.current_thread().name} >>> {i}")
        time.sleep(1)
    print(f"thread {threading.current_thread().name} ended.")

#
t = threading.Thread(target=loop, name="LoopThread", args=(10,))
t.start()

# 自定义线程
class MyThread(threading.Thread):
    def __init__(self,n):
        super(MyThread, self).__init__()
        self.n = n

    def run(self):
        print(f"thread {threading.current_thread().name} is running...")
        for i in range(self.n):
            print(f"thread {threading.current_thread().name} >>> {i}")
            time.sleep(1)
        print(f"thread {threading.current_thread().name} ended.")
1、子线程阻塞进程结束
主线程结束后,进程会等待子线程结束后再结束
print(f"thread {threading.current_thread().name} is running...")
t = threading.Thread(target=loop, name="LoopThread", args=(10,))
t.start()
print(f"thread {threading.current_thread().name} ended.")

# 主线程结束后子线程继续执行,子线程结束之后进程结束。
>>> thread MainThread is running...
>>> thread LoopThread is running...
>>> thread LoopThread >>> 0
>>> thread LoopThread >>> 1
>>> thread MainThread ended.
>>> thread LoopThread >>> 2
>>> thread LoopThread >>> 3
>>> thread LoopThread >>> 4
>>> thread LoopThread >>> 5
>>> thread LoopThread >>> 6
>>> thread LoopThread >>> 7
>>> thread LoopThread >>> 8
>>> thread LoopThread >>> 9
>>> thread LoopThread ended.
2、join
通过使用join方法,可在join处阻塞主线程
print(f"thread {threading.current_thread().name} is running...")
t = threading.Thread(target=loop, name="LoopThread", args=(10,))
t.start()
t.join()
print(f"thread {threading.current_thread().name} ended.")

# join操作可以让主线程在join处挂起等待,直到子线程执行结束之后,再继续往下执行。
>>> thread MainThread is running...
>>> thread LoopThread is running...
>>> thread LoopThread >>> 0
>>> thread LoopThread >>> 1
>>> thread LoopThread >>> 2
>>> thread LoopThread >>> 3
>>> thread LoopThread >>> 4
>>> thread LoopThread >>> 5
>>> thread LoopThread >>> 6
>>> thread LoopThread >>> 7
>>> thread LoopThread >>> 8
>>> thread LoopThread >>> 9
>>> thread LoopThread ended.
>>> thread MainThread ended.
3、守护进程daemon
通过使用daemon参数,使子线程处于守护进程状态,主线程结束后直接结束进程,同时kill子线程
print(f"thread {threading.current_thread().name} is running...")
t = threading.Thread(target=loop, name="LoopThread", args=(10,), daemon=True)
t.start()
print(f"thread {threading.current_thread().name} ended.")

# 守护线程即daemon线程,它的英文直译其实是后台驻留程序,所以我们也可以理解成后台线程,这样更方便理解。daemon线程和用户线程级别不同,进程不会主动等待daemon线程的执行,当所有用户级线程执行结束之后即会退出。进程退出时会kill掉所有守护线程。

>>> thread MainThread is running...
>>> thread LoopThread is running...
>>> thread LoopThread >>> 0
>>> thread MainThread ended.
4、daemon + join
使用daemon守护进程时,join处子线程依旧会阻塞主线程
print(f"thread {threading.current_thread().name} is running...")
t = threading.Thread(target=loop, name="LoopThread", args=(10,), daemon=True)
t.start()
t.join()
print(f"thread {threading.current_thread().name} ended.")

>>> thread MainThread is running...
>>> thread LoopThread is running...
>>> thread LoopThread >>> 0
>>> thread LoopThread >>> 1
>>> thread LoopThread >>> 2
>>> thread LoopThread >>> 3
>>> thread LoopThread >>> 4
>>> thread LoopThread >>> 5
>>> thread LoopThread >>> 6
>>> thread LoopThread >>> 7
>>> thread LoopThread >>> 8
>>> thread LoopThread >>> 9
>>> thread LoopThread ended.
>>> thread MainThread ended.
5、join(timeout)
join设置timeout时间,到时间后继续执行主线程,子线程不再阻塞主线程
print(f"thread {threading.current_thread().name} is running...")
t = threading.Thread(target=loop, name="LoopThread", args=(10,), daemon=True)
t.start()
t.join(2)
print(f"thread {threading.current_thread().name} ended.")
# 为了预防子线程锁死一直无法退出的情况, 我们还可以在join当中设置timeout,即最长等待时间,当等待时间到达之后,将不再等待。
>>> thread MainThread is running...
>>> thread LoopThread is running...
>>> thread LoopThread >>> 0
>>> thread LoopThread >>> 1
>>> thread MainThread ended.
6、多个子线程的timeout
主线程中有n个子线程,则join的总阻塞时间为n * timeout,而非timeout
print(f"thread {threading.current_thread().name} is running...")
ths = []
for i in range(3):
    t = threading.Thread(target=loop, name="LoopThread" + str(i), args=(10,), daemon=True)
    ths.append(t)

for t in ths:
    t.start()

for t in ths:
    t.join(2)

print(f"thread {threading.current_thread().name} ended.")
# 当有N个子线程时,主线程一共会等待N * timeout的时间,比如2*3 == 6
>>> thread MainThread is running...
>>> thread LoopThread0 is running...
>>> thread LoopThread0 >>> 0
>>> thread LoopThread1 is running...
>>> thread LoopThread1 >>> 0
>>> thread LoopThread2 is running...
>>> thread LoopThread2 >>> 0
>>> thread LoopThread0 >>> 1
>>> thread LoopThread1 >>> 1

>>> thread LoopThread2 >>> 1
>>> thread LoopThread0 >>> 2
>>> thread LoopThread1 >>> 2
>>> thread LoopThread2 >>> 2
>>> thread LoopThread0 >>> 3
>>> thread LoopThread1 >>> 3

>>> thread LoopThread2 >>> 3
>>> thread LoopThread0 >>> 4
>>> thread LoopThread1 >>> 4
>>> thread LoopThread2 >>> 4
>>> thread LoopThread0 >>> 5
>>> thread LoopThread1 >>> 5
>>> thread LoopThread2 >>> 5

>>> thread MainThread ended.
7、多线程共享全局变量
线程是进程的执行单元,进程是系统分配资源的最小单位,所以在同一个进程中的多线程是共享资源的。
import threading
import time

g_num = 100

def work1():
    global g_num
    for i in range(3):
        g_num += 1
    print("in work1 g_num is : %d" % g_num)

def work2():
    global g_num
    print("in work2 g_num is : %d" % g_num)

if __name__ == '__main__':
    t1 = threading.Thread(target=work1)
    t1.start()
    time.sleep(1)
    t2 = threading.Thread(target=work2)
    t2.start()

----------------------------------

>>> in work1 g_num is : 103
>>> in work2 g_num is : 103
8、互斥锁(threading.lock())
由于线程之间是进行随机调度,并且每个线程可能只执行n条执行之后,当多个线程同时修改同一条数据时可能会出现脏数据,所以,出现了线程锁,即同一时刻允许一个线程执行操作。线程锁用于锁定资源,你可以定义多个锁, 像下面的代码, 当你需要独占某一资源时,任何一个锁都可以锁这个资源,就好比你用不同的锁都可以把相同的一个门锁住是一个道理。
由于线程之间是进行随机调度,如果有多个线程同时操作一个对象,如果没有很好地保护该对象,会造成程序结果的不可预期,我们也称此为“线程不安全”。
为了方式上面情况的发生,就出现了互斥锁(Lock)
from threading import Thread,Lock
import os,time
def work():
    global n
    lock.acquire()
    temp = n
    time.sleep(0.1)
    n = temp - 1
    print(f"{threading.current_thread().name}--{n}")
    lock.release()


if __name__ == '__main__':
    lock = Lock()
    n = 10
    l = []
    for i in range(10):
        p = Thread(target=work, name=f"Thread-{i}")
        l.append(p)
        p.start()

    for p in l:
        p.join()
    print(f"finally n = {n}")

>>> Thread-0--9
>>> Thread-1--8
>>> Thread-2--7
>>> Thread-3--6
>>> Thread-4--5
>>> Thread-5--4
>>> Thread-6--3
>>> Thread-7--2
>>> Thread-8--1
>>> Thread-9--0
>>> finally n = 0
9、递归锁(threading.RLock())
RLcok类的用法和Lock类一模一样,但它支持嵌套,在多个锁没有释放的时候一般会使用RLcok类。
import threading
import time

def func(rlock):
    global gl_num
    rlock.acquire()
    gl_num += 1
    time.sleep(1)
    print(f"{threading.current_thread().name}--{gl_num}")
    rlock.release()


if __name__ == '__main__':
    gl_num = 0
    lock = threading.RLock()
    for i in range(10):
        t = threading.Thread(target=func, name=f"Thread-{i}", args=(lock,))
        t.start()
    print(f"thread {threading.current_thread().name} ended.")


>>> thread MainThread ended.
>>> Thread-0--1
>>> Thread-1--2
>>> Thread-2--3
>>> Thread-3--4
>>> Thread-4--5
>>> Thread-5--6
>>> Thread-6--7
>>> Thread-7--8
>>> Thread-8--9
>>> Thread-9--10
10、信号量(threading.BoundedSemaphore())
互斥锁同时只允许一个线程更改数据,而Semaphore是同时允许一定数量的线程更改数据 ,比如厕所有3个坑,那最多只允许3个人上厕所,后面的人只能等里面有人出来了才能再进去。
import threading
import time

def run(n, semaphore):
    semaphore.acquire()   #加锁
    time.sleep(1)
    print("run the thread:%s\n" % n)
    semaphore.release()     #释放

if __name__ == '__main__':
    num = 0
    semaphore = threading.BoundedSemaphore(5)  # 最多允许5个线程同时运行
    for i in range(22):
        t = threading.Thread(target=run, args=("t-%s" % i, semaphore))
        t.start()
    while threading.active_count() != 1:
        pass  # print threading.active_count()
    else:
        print('-----all threads done-----')

>>> run the thread:t-3
>>> run the thread:t-2
>>> run the thread:t-1
>>> run the thread:t-0
>>> run the thread:t-4
>>> run the thread:t-5
>>> run the thread:t-7
>>> run the thread:t-8
>>> run the thread:t-6
>>> run the thread:t-9
>>> run the thread:t-11
>>> run the thread:t-12
>>> run the thread:t-13
>>> run the thread:t-10
>>> run the thread:t-14
>>> run the thread:t-19
>>> run the thread:t-18
>>> run the thread:t-15
>>> run the thread:t-17
>>> run the thread:t-16
>>> run the thread:t-20
>>> run the thread:t-21
>>> -----all threads done-----
11、事件(threading.Event())
python线程的事件用于主线程控制其他线程的执行,事件是一个简单的线程同步对象,其主要提供以下几个方法:
clear 将flag设置为“False” set 将flag设置为“True” is_set 判断是否设置了flag wait 会一直监听flag,如果没有检测到flag就一直处于阻塞状态 事件处理的机制:全局定义了一个“Flag”,当flag值为“False”,那么event.wait()就会阻塞,当flag值为“True”,那么event.wait()便不再阻塞。
#利用Event类模拟红绿灯
import threading
import time

event = threading.Event()


def lighter():
    count = 0
    event.set()     #初始值为绿灯
    while True:
        if 5 < count <=10 :
            event.clear()  # 红灯,清除标志位
            print("red light is on...!!!!!!!!!!")
        elif count > 10:
            event.set()  # 绿灯,设置标志位
            count = 0
        else:
            print("green light is on...~~~~~~~~~~")

        time.sleep(1)
        count += 1

def car(name):
    while True:
        if event.is_set():      #判断是否设置了标志位
            print("[%s] running..."%name)
            time.sleep(1)
        else:
            print("[%s] sees red light,waiting..."%name)
            event.wait()
            print("[%s] green light is on,start going..."%name)

light = threading.Thread(target=lighter,)
light.start()

car = threading.Thread(target=car,args=("MINI",))
car.start()


>>> green light is on...~~~~~~~~~~
>>> [MINI] running...
>>> green light is on...~~~~~~~~~~
>>> [MINI] running...
>>> green light is on...~~~~~~~~~~[MINI] running...

>>> green light is on...~~~~~~~~~~[MINI] running...

>>> [MINI] running...
>>> green light is on...~~~~~~~~~~
>>> green light is on...~~~~~~~~~~[MINI] running...

>>> red light is on...!!!!!!!!!!
>>> [MINI] sees red light,waiting...
>>> red light is on...!!!!!!!!!!
>>> red light is on...!!!!!!!!!!
>>> red light is on...!!!!!!!!!!
>>> red light is on...!!!!!!!!!!
>>> [MINI] green light is on,start going...
>>> [MINI] running...
>>> green light is on...~~~~~~~~~~
>>> [MINI] running...
>>> green light is on...~~~~~~~~~~
>>> [MINI] running...
>>> green light is on...~~~~~~~~~~[MINI] running...
12、全局解释器锁(GIL)
在非python环境中,单核情况下,同时只能有一个任务执行。多核时可以支持多个线程同时执行。但是在python中,无论有多少核,同时只能执行一个线程。究其原因,这就是由于GIL的存在导致的。
GIL的全称是Global Interpreter Lock(全局解释器锁),来源是python设计之初的考虑,为了数据安全所做的决定。某个线程想要执行,必须先拿到GIL,我们可以把GIL看作是“通行证”,并且在一个python进程中,GIL只有一个。拿不到通行证的线程,就不允许进入CPU执行。GIL只在cpython中才有,因为cpython调用的是c语言的原生线程,所以他不能直接操作cpu,只能利用GIL保证同一时间只能有一个线程拿到数据。而在pypy和jpython中是没有GIL的。
Python多线程的工作过程:
python在使用多线程的时候,调用的是c语言的原生线程。
- 拿到公共数据
- 申请gil
- python解释器调用os原生线程
- os操作cpu执行运算
- 当该线程执行时间到后,无论运算是否已经执行完,gil都被要求释放
- 进而由其他进程重复上面的过程
- 等其他进程执行完后,又会切换到之前的线程(从他记录的上下文继续执行),整个过程是每个线程执行自己的运算,当执行时间到就进行切换(context switch)。
- python针对不同类型的代码执行效率也是不同的:
1、CPU密集型代码(各种循环处理、计算等等),在这种情况下,由于计算工作多,ticks计数很快就会达到阈值,然后触发GIL的释放与再竞争(多个线程来回切换当然是需要消耗资源的),所以python下的多线程对CPU密集型代码并不友好。
2、IO密集型代码(文件处理、网络爬虫等涉及文件读写的操作),多线程能够有效提升效率(单线程下有IO操作会进行IO等待,造成不必要的时间浪费,而开启多线程能在线程A等待时,自动切换到线程B,可以不浪费CPU的资源,从而能提升程序执行效率)。所以python的多线程对IO密集型代码比较友好。
使用建议?
python下想要充分利用多核CPU,就用多进程。因为每个进程有各自独立的GIL,互不干扰,这样就可以真正意义上的并行执行,在python中,多进程的执行效率优于多线程(仅仅针对多核CPU而言)。
GIL在python中的版本差异:
1、在python2.x里,GIL的释放逻辑是当前线程遇见IO操作或者ticks计数达到100时进行释放。(ticks可以看作是python自身的一个计数器,专门做用于GIL,每次释放后归零,这个计数可以通过sys.setcheckinterval 来调整)。而每次释放GIL锁,线程进行锁竞争、切换线程,会消耗资源。并且由于GIL锁存在,python里一个进程永远只能同时执行一个线程(拿到GIL的线程才能执行),这就是为什么在多核CPU上,python的多线程效率并不高。
2、在python3.x中,GIL不使用ticks计数,改为使用计时器(执行时间达到阈值后,当前线程释放GIL),这样对CPU密集型程序更加友好,但依然没有解决GIL导致的同一时间只能执行一个线程的问题,所以效率依然不尽如人意。
四、Share
损失厌恶
损失厌恶是指人们面对同样数量的收益和损失时,认为损失更加令他们难以忍受。同量的损失带来的负效用为同量收益的正效用的2.5倍。损失厌恶反映了人们的风险偏好并不是一致的,当涉及的是收益时,人们表现为风险厌恶;当涉及的是损失时,人们则表现为风险寻求。
例如,试验显示,许多人宁愿选择无风险(即100%的机会)地获得3000元,而不会选择有80%的机会赢得4000元的赌博。 我觉得还有一种现象:遇到股票连续跌停的时候,人们偏向于攥在手里期待转折,而不是立即卖出止损
还有一种情况是短视损失厌恶(myopic loss aversion)。在证券投资中,长期收益可能会周期性地被短视损失所打断,短视的投资者把股票市场视同赌场,过分强调潜在的短期损失。这些投资者可能没有意识到,通货膨胀的长期影响可能会远远超过短期内股票的涨跌。由于短视的损失厌恶,人们在其长期的资产配置中,可能过于保守。
《软件测试价值提升之路》3-4 心得
作为一个测试团队,基本的职责是:测试产品,发现缺陷,报告结果,使每个版本的测试水准稳步提升。这些价值是作为一个测试所必须具备的,发挥这些价值能够让测试获得研发团队的基本信任。 这类价值分为3部分:
1)拦截缺陷,即对产品进行测试,尽可能把产品的缺陷拦截在研发阶段。 2)提供数据,即提供产品的质量结论,并且给出支撑这些结论的数据。 3)测试过程可控,提升测试团队和测试工程师的能力,使得产品测试的效率、质量、成本都处于可控状态。
一、拦截缺陷
“扫门前雪”说明这些价值基本上是测试的本职工作,价值的发挥是依靠测试自身或者以测试为主进行能力建设。当然,这并不是说测试必须将这些价值发挥到极致,测试工程师们还需要权衡成本和收益,找到合适的“度”。
拦截缺陷是测试最基本的价值,尽可能多地发现缺陷,尽可能在版本发布前发现并解决影响用户使用的缺陷,这是测试这个职业存在的基础。
一个测试团队或者测试工程师,如果经常将基本功能缺陷漏出去,那是无论如何也得不到信任的。这也不是说只要产品到客户那里有遗留缺陷,测试活动就一定有问题,拦截缺陷的能力就一定需要改进。通常还是会视缺陷的影响程度而定。
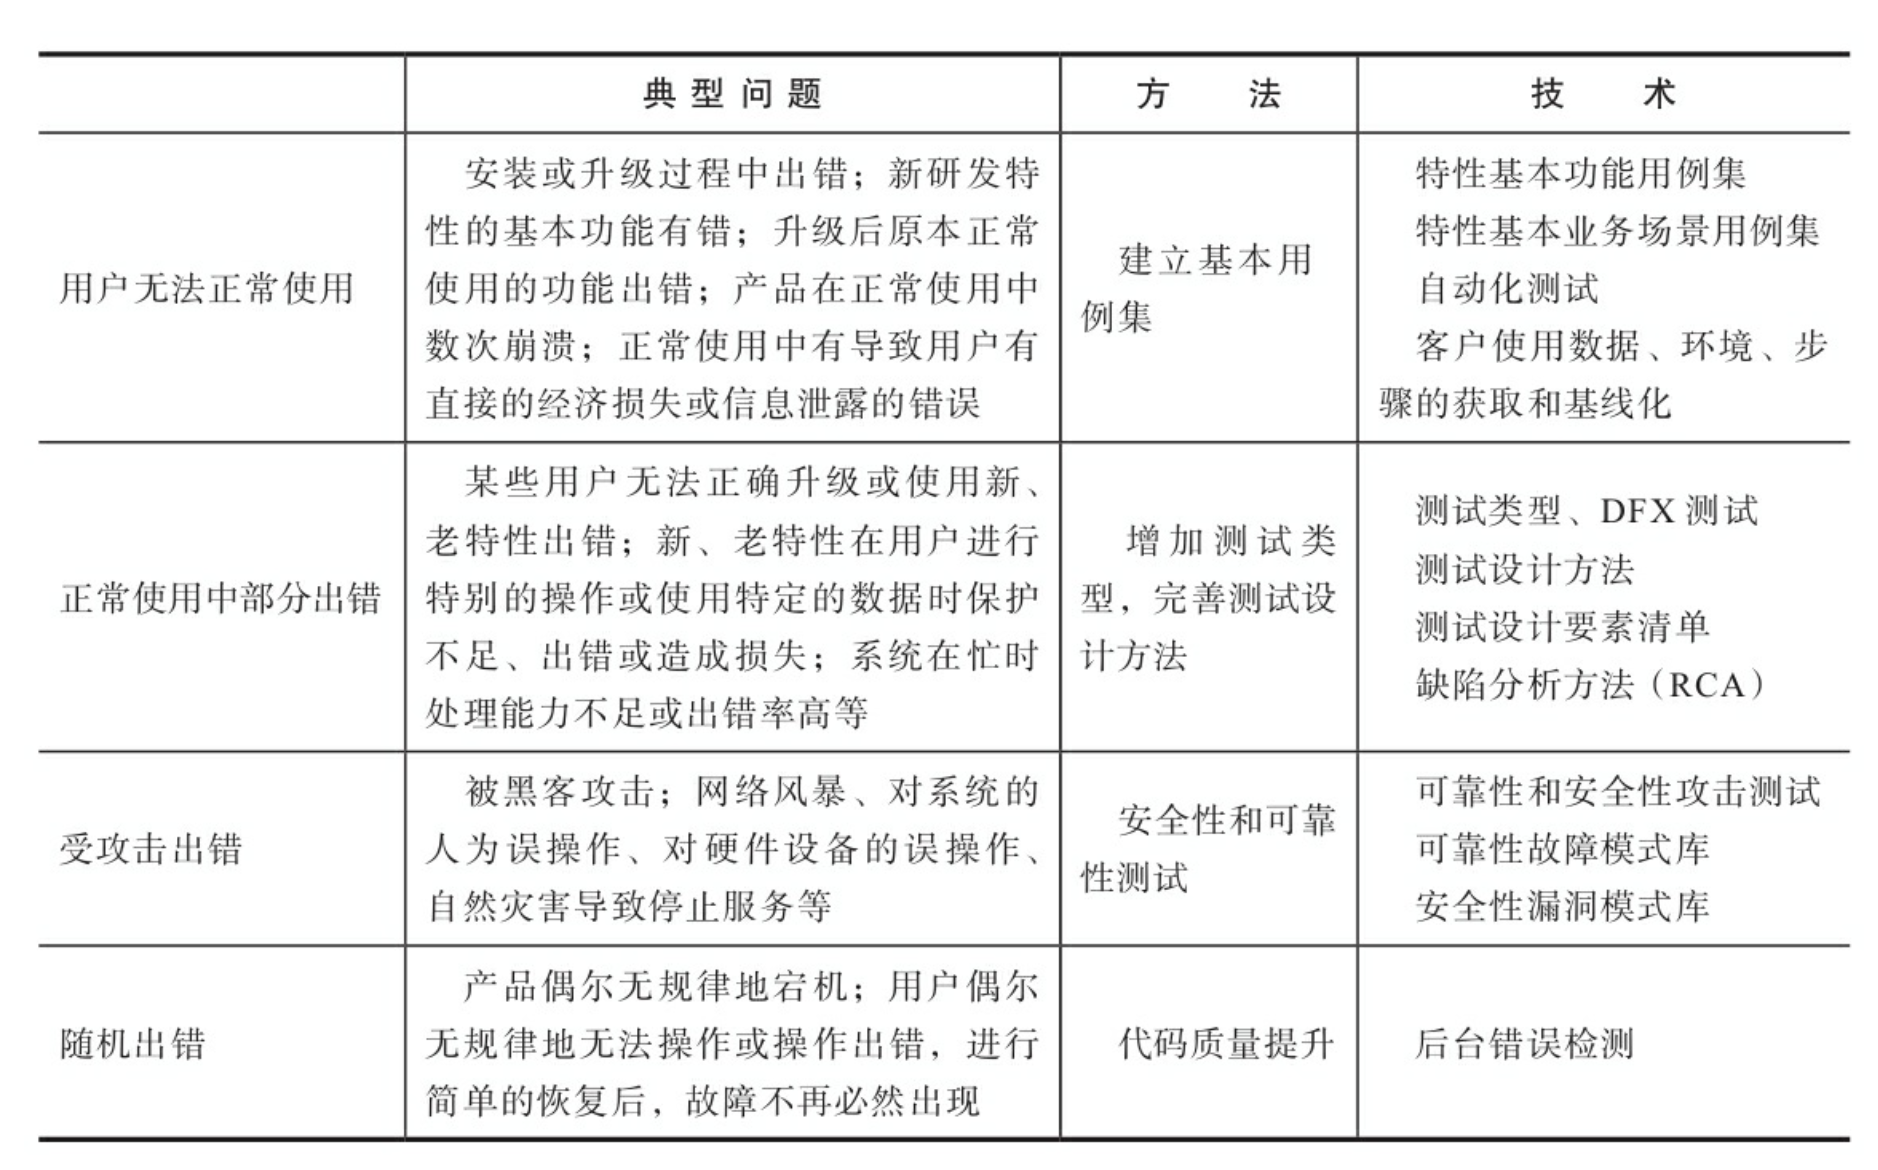
为了方便说明问题的解决办法,这里按照缺陷的激活条件(产品中的错误在特定条件下被激活,导致产品出现故障,这个“特定条件”就是激活条件),把缺陷分为4类:
A 基本功能缺陷
用户进行正常业务的基本操作时,由于缺陷导致业务操作无法完成。这类缺陷对用户的影响最大,是研发需要最优先解决的问题。
【解决方法】 这类缺陷的发现条件是:只要测试时覆盖到了这个功能或特性,就能够发现缺陷。因此,在遇到这类问题的时候,推荐的解决思路是: 1)建立基本测试用例基线(测试用例基线类似代码基线,是产品截止到某个版本时,产品全部测试用例及其测试结果的集合,这是产品下一个版本测试的基础,故称基线。基本测试用例基线是测试用例基线的一个子集),基本测试用例集包含产品最常见的业务场景,覆盖绝大部分功能特性。 2)尽可能实现100%自动化测试,在每次启动测试、产品发布之前都将基本测试用例全部测试一遍。 3)有时候出现问题还与客户数据、环境、使用方法有关,那么基本用例基线的测试用例就需要包含客户的数据、环境、应用场景等信息,并按版本、客户进行管理。
B 常规使用缺陷
用户大部分情况下能完成正常的业务操作,但在特定的条件下进行业务操作时,缺陷被激活导致操作无法完成,产品绝大部分的缺陷都属于这一类。想要减少这类缺陷,需要进一步按故障的影响范围和严重程度找到优先解决的重点。
【解决方法】
1)扩展基本用例集,使之包含安装、升级、应用场景、性能的部分用例; 2)形成测试设计要素集,完善测试设计方法。 3)客户问题根本原因(RCA)分析:提升能力的目的是解决问题
C 受攻击暴露的缺陷
产品出现故障并非由于用户的业务操作,而是由于软硬件或网络环境发生异常、业务请求量超出预期而造成过载、受到黑客攻击等。这类缺陷对用户的影响很大,但用户会基于成本来考虑解决的方式,不一定全部是通过增强软件能力来解决。
【解决方法】 通过对产品进行攻击,检验新加上的机制是否在各种已知攻击下都能够生效。 通常可以根据网络上公布出来的安全性漏洞和可靠性故障模式。 1)特性测试。2)故障注入。3)可靠性指标测试。
D 随机出现的缺陷
产品出现故障的条件不明确,如果故障的影响范围大、严重程度高、出现频次高,也会对缺陷进行专项分析。
【解决方法】 根据以往经验,这类缺陷通常是编码质量存在问题,因此第一选择是提升代码质量。即使用静态测试工具对代码进行检查,排除容易引起越界、空值一类的问题,如果问题的影响比较大,还会进行代码走查,排除代码逻辑上的错误。
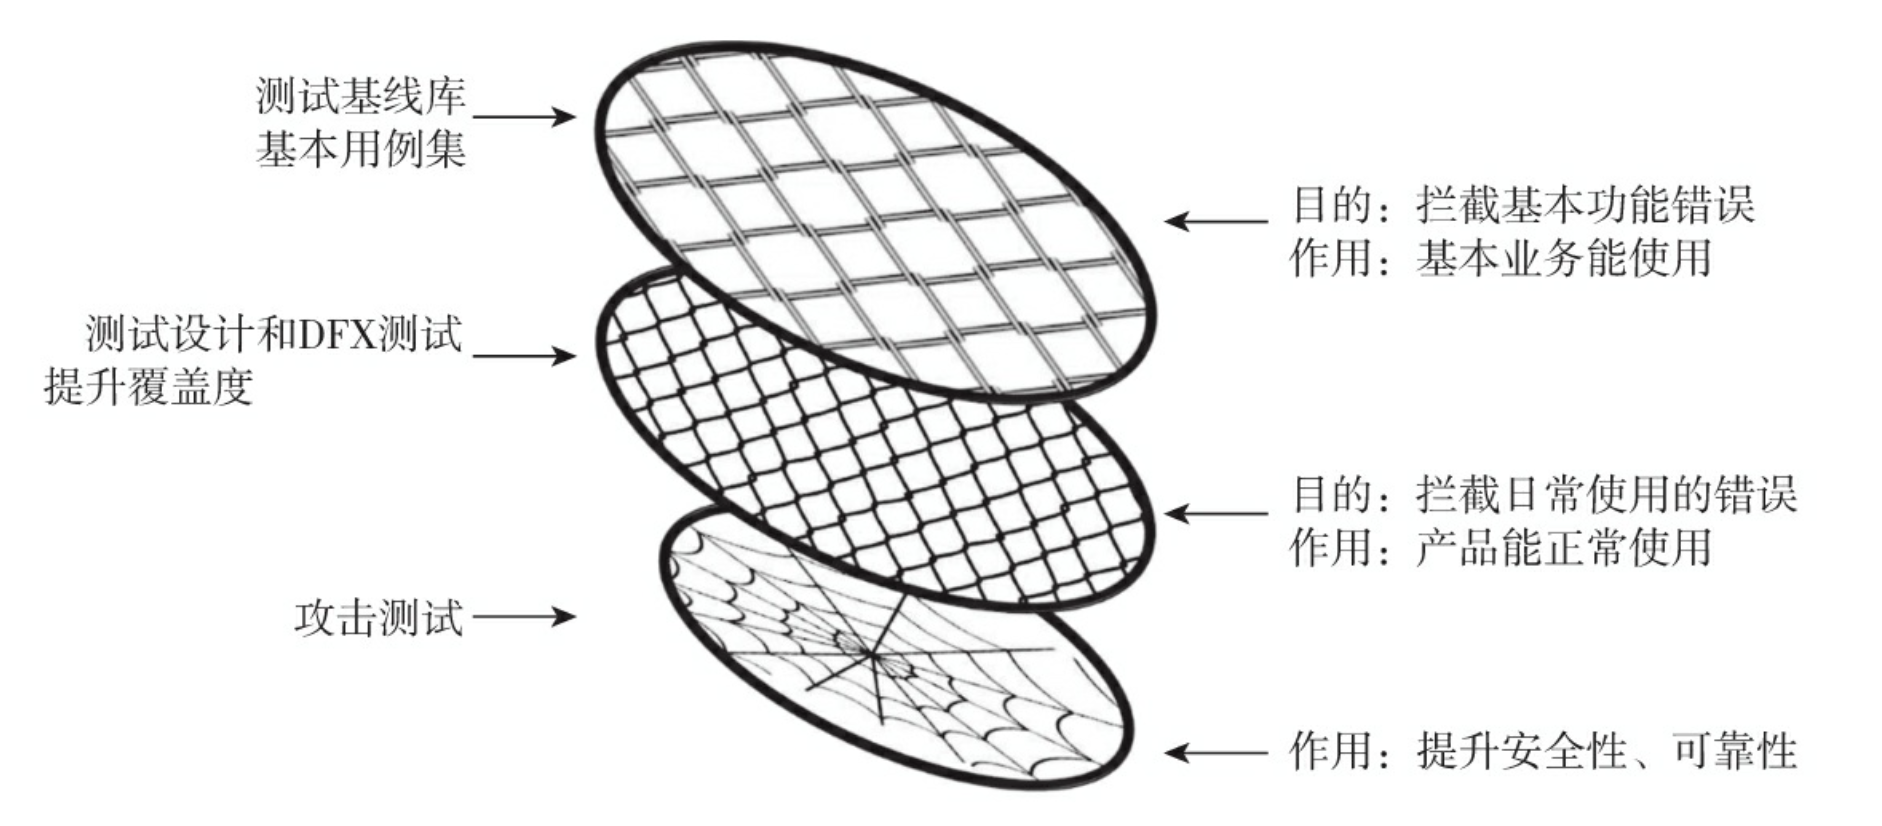
E 分层构建缺陷拦截能力


二、数据提供
提供数据也是测试的基本价值,测试提供的数据,理论上是研发团队进行各阶段决策的主要依据之一。
测试提供的数据,一方面包含产品质量的结论,这些数据让研发团队形成对产品质量的认知;另一方面包含研发过程的分析,这些数据让研发团队其他成员了解和信任测试工作。
A 测试结果数据
测试结果典型的如:遗留缺陷数量和级别,主要业务流程的TPS,安装耗时,主要操作的平均响应延时等。
【作用】这部分数据是测试所提供的数据中最重要的一部分,通常在版本发布之前提供出来,供产品团队的各个角色确定产品是否发布,在什么范围发布,上线时和上线后需要做什么安排。
B 风险评估数据
技术风险。
测试进行风险管理最常用的方法是RBT,即基于风险的测试。
RBT的实施过程如下:
- 确定测试范围。
- 风险等级评估。
- 基于风险的测试。
- 风险闭环评估。

C 测试过程数据
测试过程中记录的数据有两类:测试项目过程数据和用例执行过程数据。
【作用】
测试过程数据有几方面的作用:
- 测试结论的支撑性数据。
- 发现改进点。
- 建立基准。
通过数据进行【基准分析】、【趋势分析】、【分布分析】
D 用数据讲好测试故事
我的结论是什么、我依据什么做出的结论、为什么我做的测试是足够的。
结果、风险、过程数据是测试活动的重要产出,构成了测试报告的主要内容。 根据金字塔原理,测试报告最好采用以下结构:
- 首先给出版本测试的最终结论,用例执行的结果性指标数据、遗留风险;
- 其次是详细的风险跟踪表、用例执行的关键过程数据及其图表;
- 最后是项目过程数据的分析,以及基于分析给出的改进建议。